@TOC
应用场景 需要把深度学习模型搭载到无人机上完成一些探测任务。
tensorrt tensorrt 是个推理阶段的加速框架,支持一些层的操作,不是所有的层(比如dropout ),不过也可以自定义没有的op (算子),它支持caffe、TensorFlow等。
TensorFlow=> tensorrt 用TensorFlow训练保存的模型一般为ckpt的,把他转为tensorrt支持的操作是:
ckpt=>pb=>uff
注意:这个过程需要TensorFlow计算图的输入和输出的名字。
1
2
X = tf.placeholder(tf.float32, [None, 784], name='x-input') # name就是自己起的名字,不起的话,TensorFlow会自己起
这个代码可以看有哪些节点,一般,第一个就是输入的名字,softmax或者输出层那里就是输出的名字,可以对着代码看一看。
1
2
3
4
5
6
7
8
9
10
11
def getinout(input_checkpoint): saver = tf.train.import_meta_graph(input_checkpoint + '.meta', clear_devices=True) graph = tf.get_default_graph() input_graph_def = graph.as_graph_def() with tf.Session() as sess: file = open('./nodes.txt', 'a+') for n in tf.get_default_graph().as_graph_def().node: file.write(n.name + '\n') file.close()
这个代码可以将ckpt转为pb。
1
2
3
4
5
6
7
8
9
10
11
12
13
14
15
16
17
18
19
20
21
22
23
def freeze_graph(input_checkpoint, output_graph): ''' :param input_checkpoint: :param output_graph: PB模型保存路径 :return: ''' # checkpoint = tf.train.get_checkpoint_state(model_folder) #检查目录下ckpt文件状态是否可用 # input_checkpoint = checkpoint.model_checkpoint_path #得ckpt文件路径 # 指定输出的节点名称,该节点名称必须是原模型中存在的节点 output_node_names = "Softmax" saver = tf.train.import_meta_graph(input_checkpoint + '.meta', clear_devices=True) with tf.Session() as sess: saver.restore(sess, input_checkpoint) # 恢复图并得到数据 output_graph_def = tf.graph_util.convert_variables_to_constants( # 模型持久化,将变量值固定 sess=sess, input_graph_def=sess.graph_def, # 等于:sess.graph_def output_node_names=output_node_names.split(",")) # 如果有多个输出节点,以逗号隔开 with tf.gfile.GFile(output_graph, "wb") as f: # 保存模型 f.write(output_graph_def.SerializeToString()) # 序列化输出 print("%d ops in the final graph." % len(output_graph_def.node)) # 得到当前图有几个操作节点
这个代码可以加载pb测试
1
2
3
4
5
6
7
8
9
10
11
12
13
14
15
16
17
18
19
20
21
22
23
24
25
26
27
28
29
30
31
32
33
34
35
36
37
38
39
40
41
42
43
44
45
46
47
48
49
50
51
52
53
54
55
56
import tensorflow as tf import matplotlib.pyplot as plt from tensorflow.examples.tutorials.mnist import input_data import numpy as np import uff # 下载数据集 数字1到10 mnist = input_data.read_data_sets('MNIST_data', one_hot=True) def freeze_graph_test(pb_path): ''' :param pb_path:pb文件的路径 :param image_path:测试图片的路径 :return: ''' with tf.Graph().as_default(): output_graph_def = tf.GraphDef() with open(pb_path, "rb") as f: output_graph_def.ParseFromString(f.read()) tf.import_graph_def(output_graph_def, name="") with tf.Session() as sess: sess.run(tf.global_variables_initializer()) # 定义输入的张量名称,对应网络结构的输入张量 # input:0作为输入图像,keep_prob:0作为dropout的参数,测试时值为1,is_training:0训练参数 input_image_tensor = sess.graph.get_tensor_by_name("x-input:0") # 定义输出的张量名称 output_tensor_name = sess.graph.get_tensor_by_name("Softmax:0") # 读取测试图片,num可以随便改 # THIS WILL LOAD ONE TRAINING EXAMPLE num = 600 x_train = mnist.test.images[num , :].reshape(1, 784) y_train = mnist.test.labels[num , :] np.set_printoptions(precision=1) np.set_printoptions(suppress=True) # THIS GETS OUR LABEL AS A INTEGER label = y_train.argmax() out = sess.run(output_tensor_name, feed_dict={input_image_tensor: x_train}) print("out:{}".format(out)) score = tf.nn.softmax(out, name='pre') class_id = tf.argmax(score, 1) print("pre class_id:{}".format(sess.run(class_id))) # plt.title('Prediction: %d Label: %s' % (1, label)) plt.imshow(x_train.reshape([28, 28]), cmap=plt.get_cmap('gray_r')) plt.show() if __name__ == '__main__': # 输出pb模型的路径 out_pb_path = "models/frozen_model.pb" freeze_graph_test(pb_path=out_pb_path)
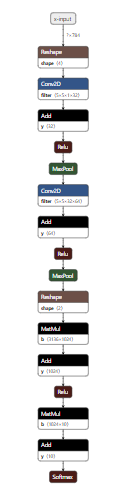
可视化模型 在线可视化模型 ,导入ckpt或者pb就可以看类似流程图的计算图。
pb=>uff 教程说是用tensorrt带的convert-to-uff 就转了。。。我TM找了半天根本没有,后来也发现秒算上的tensorrt根本就没有Python模块,都是c++的API。解决:** convert_to_uff.py 文件
1 (tf-gpu) D:\Anaconda\envs\tf-gpu\Lib\site-packages\uff\bin>python convert_to_uff.py frozen_model.pb
这样就有了uff文件了。
tensorrt样例 tensorrt下的samples 里有加载TensorFlow模型的样例sampleUffMNIST 。改一改里面加载uff 文件的cpp 代码基本就行了。make 一下,就会在tensorrt的bin 目录下生成可执行的文件了。
1
2
3
4
5
6
7
8
9
10
11
12
13
14
15
16
17
18
19
20
21
22
23
24
25
26
27
28
29
30
31
32
33
34
35
36
37
38
39
40
41
42
43
44
45
46
47
48
49
50
51
52
53
54
55
56
57
58
59
60
61
62
63
64
65
66
67
68
69
70
71
72
73
74
75
76
77
78
79
80
81
82
83
84
85
86
87
88
89
90
91
92
93
94
95
96
97
98
-------------------------- @@@@@@@@@@@@@@@@@@@@@@@@@@@@ @@@@@@@@@@@@@@@@@@@@@@@@@@@@ @@@@@@@@@@@@@@@@@@@@@@@@@@@@ @@@@@@@@@@@@@@@@@@@@@@@@@@@@ @@@@@@@@@@@@@@@@+ :@@@@@@@@ @@@@@@@@@@@@@@%= :. --%@@@@@ @@@@@@@@@@@@@%. -@= - :@@@@@ @@@@@@@@@@@@@: -@@#%@@ #@@@@ @@@@@@@@@@@@: #@@@@@@@-#@@@@ @@@@@@@@@@@= #@@@@@@@@=%@@@@ @@@@@@@@@@= #@@@@@@@@@:@@@@@ @@@@@@@@@+ -@@@@@@@@@%.@@@@@ @@@@@@@@@::@@@@@@@@@@+-@@@@@ @@@@@@@@-.%@@@@@@@@@@.*@@@@@ @@@@@@@@ *@@@@@@@@@@@ *@@@@@ @@@@@@@% %@@@@@@@@@%.-@@@@@@ @@@@@@@:*@@@@@@@@@+. %@@@@@@ @@@@@@# @@@@@@@@@# .*@@@@@@@ @@@@@@# @@@@@@@@= +@@@@@@@@ @@@@@@# @@@@@@%. .+@@@@@@@@@ @@@@@@# @@@@@*. -%@@@@@@@@@@ @@@@@@# --- =@@@@@@@@@@@@ @@@@@@# *%@@@@@@@@@@@@@ @@@@@@@%: -=%@@@@@@@@@@@@@@@ @@@@@@@@@@@@@@@@@@@@@@@@@@@@ @@@@@@@@@@@@@@@@@@@@@@@@@@@@ @@@@@@@@@@@@@@@@@@@@@@@@@@@@ @@@@@@@@@@@@@@@@@@@@@@@@@@@@ 10 eltCount --- OUTPUT --- 0 => 3.41521 : *** 1 => -11.118 : 2 => -2.60688 : 3 => -5.37433 : 4 => -14.5769 : 5 => -0.0877042 : 6 => -1.25683 : 7 => -11.7811 : 8 => -5.30992 : 9 => -8.00871 : --------------------------- @@@@@@@@@@@@@@@@@@@@@@@@@@@@ @@@@@@@@@@@@@@@@@@@@@@@@@@@@ @@@@@@@@@@@@@@@@@@@@@@@@@@@@ @@@@@@@@@@@@@@@@@@@@@@@@@@@@ @@@@@@@@@@@@+ @@@@@@@@@@@@@@ @@@@@@@@@@@@. @@@@@@@@@@@@@@ @@@@@@@@@@@@- @@@@@@@@@@@@@@ @@@@@@@@@@@# @@@@@@@@@@@@@@ @@@@@@@@@@@# *@@@@@@@@@@@@@ @@@@@@@@@@@@ :@@@@@@@@@@@@@ @@@@@@@@@@@@= .@@@@@@@@@@@@@ @@@@@@@@@@@@# %@@@@@@@@@@@@ @@@@@@@@@@@@% .@@@@@@@@@@@@@ @@@@@@@@@@@@% %@@@@@@@@@@@@ @@@@@@@@@@@@% %@@@@@@@@@@@@ @@@@@@@@@@@@@= +@@@@@@@@@@@@ @@@@@@@@@@@@@* -@@@@@@@@@@@@ @@@@@@@@@@@@@* @@@@@@@@@@@@ @@@@@@@@@@@@@@ @@@@@@@@@@@@ @@@@@@@@@@@@@@ *@@@@@@@@@@@ @@@@@@@@@@@@@@ *@@@@@@@@@@@ @@@@@@@@@@@@@@ *@@@@@@@@@@@ @@@@@@@@@@@@@@ *@@@@@@@@@@@ @@@@@@@@@@@@@@* @@@@@@@@@@@@ @@@@@@@@@@@@@@@@@@@@@@@@@@@@ @@@@@@@@@@@@@@@@@@@@@@@@@@@@ @@@@@@@@@@@@@@@@@@@@@@@@@@@@ @@@@@@@@@@@@@@@@@@@@@@@@@@@@ 10 eltCount --- OUTPUT --- 0 => -10.9159 : 1 => 3.85835 : *** 2 => -5.38455 : 3 => -3.43404 : 4 => -5.66351 : 5 => -5.13578 : 6 => -3.38536 : 7 => -7.77694 : 8 => -0.558315 : 9 => -4.30673 : ---------------------------
这样,自己训练的TensorFlow模型就能在无人机上跑起来了!